Search This Blog

8/22/11

STRUCTURE Three Drawings

Three Drawings
For the standing and a seated poses I did several two minute sketches and a couple of longer sketches before the main drawing. These were very helpful in giving me and idea of the basic proportions and shape of the forms. Oddly enough, (not really for me) in a couple of cases I think some of the sketches had more potential than the drawings. 
pencil
For the lying down pose I did three to four sketches – each one of about 5 minutes duration. It was hard to get the model’s feet and arms in the right position and to judge locations in relation the line of gravity, even with repeated measuring. Not helped by the model moving his arm from time to time and not putting it back in the exact same place as before. My final drawing had to be completed in forty minutes as the model was tired. I certainly didn’t intend to spend more than an hour on the drawing in any case as the brief was to spend only half to one hour on it. Apart from that it was interesting to see the amount of progress I could make in the space of forty minutes. I will be able to look back on it to compare with what I am able to do in the time at a later stage in my development.
  
Check & Log
Did you try to imagine the sitter’s skeleton and muscles? Did this help you to convey the figure’s structure and form?
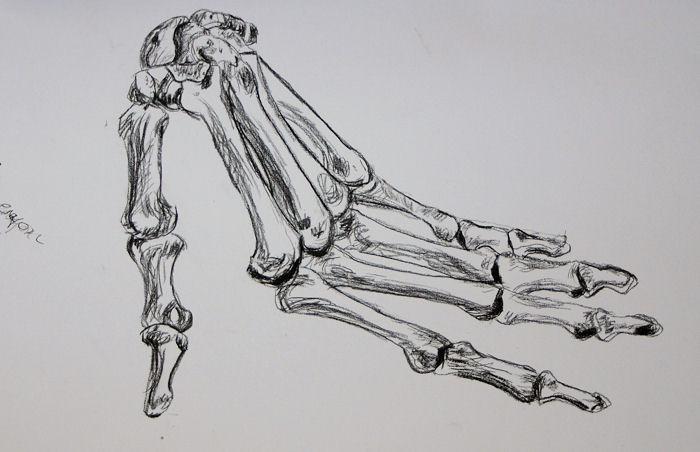
black art pen

After the reading I did on anatomy, I was quite confident it had the effect of helping me to visualize the underlying skeleton and muscles when doing the drawings. It also gave me a better awareness of the exact locations of important joints – ankle, elbow, knee and hips and I felt that I could make more sense of and indicate the features on the surface, such as the elbows, knees and ankle joints on the sitting and standing poses.  Having an idea that certain muscles form alternating masses pulling in opposite directions, such as those of the front of the thigh and the calf muscles of the lower leg helped me to notice and include their alternating curves with the standing and sitting poses. However I seemed to completely lose the effect in the calf muscle on show in the drawing of the lying down pose. I think because I was so conscious of the limited time on this occasion, plus I had already spent a lot of time on this one, struggling with the proportions.      
  
How accurately did you depict the overall proportions of the figure?
I feel more relaxed if I sketch in some basic free flowing lines to indicate the gesture of the model before I start to concentrate on the proportions and angles of the head, shoulders and hips. Then start to fill in the basic forms starting with the head.
willow charcoal

I spent a full hour on the drawings of the sitting and standing poses.  The main areas of difficulty for me occurred on the lying down and sitting poses, due to the amount of foreshortening. Despite careful and repeated measurements in both I felt that certain areas like the head and feet were particularly awkward and didn’t look quite right when I had completed them. I understand that the head in the sitting pose should be larger than in the lying down pose because the model was sitting up so wasn’t as far back in space as when lying down and at the furthest point away. Where the model is sitting down the thighs are very foreshortened - infact the knees are almost level with the hips (pelvis), the effect being to visually squash some features down.  Yet each time I look at the head it appears too big in relation to the length of the body, the shoulders look a little too wide. I’m not sure if the feet are too small, considering they are much closer than the head. In the lying down pose I feel that this time I have overly exaggerated the size of the feet - even though they are again very close on the picture plane and the head looks small in relation to most of the body.

 Rembrandt’s Study of a Man (right) is another seated pose where the feet are nearest to the onlooker and they look larger than the feet in my seated pose. The upper body also looks fairly upright with a lot of foreshortening in the legs. The head only fits into the upper torso about 2.5 times – the same as the head in my own drawing of a seated pose. I also noticed how he has managed to indicate very convincingly the depression between the bones of the fingers on one hand and the hollow in the shoulder around the clavicle, with just a few deft strokes of the drawing tool.


8/15/11

STRUCTURE - Research Point

Anatomy
Very often when a figure is wrong it easy to see without always knowing exactly what it is. That’s why it is important to have an idea of what is going on deep down under the surface of the skin to appreciate what’s happening close the surface.
On the skeleton there are places where the bones are very near to the overlying skin and these places are visible on most people, even those very overweight. Apart from many points on the head such as the forehead, cheekbones and chin, elsewhere there is also the wrist and anklebones amongst others. These areas are seen as depressions between the main muscle masses and sometimes as projections on thin people.
Bones of the hand -conte crayon
Although each person’s body shape is unique, all human bodies work in a similar way. The muscles and their connections are made up of a contracting and expanding system of pulleys, shock absorbers and self lubricating hinges. They are interdependent with the skeleton and without bones, the muscles would not hold together. Muscles connect two different bones, passing over one or more joints. An example is the calf muscle where its origin is on the upper leg bone and its insertion on the heel bone. It pulls the heel up and toes down when it contracts. This gives forward propulsion to the body when walking. The pelvis and buttock muscle (gluteus maximus) are the primary support for the backbone and are most important in establishing the balance of the figure. The legs have very mobile joints with the pelvis and support the weight of the rest of the body. This is the major difference between humans and animals.
My own version
In drawing the body being able to recognize the main muscle groups is very helpful in selecting which forms are the most significant. It helps in placement of lines (lines between  functions) at meeting points even though they are not visible on the figure.

After Andreas Vesaluiua De Humani Corporis Fabrica, 1543, New York Academy of Medicine from Drawing Lessons from theGreat Masters by Robert Beverly-Hale.
I knew from looking at this drawing that it is very complex. I didn’t intend to copy the whole figure at one go and soon after I started I began to realize just how complicated it is. 
 There are many muscles clustered around the top of the lower arm but each one can be broken down into just three groups: the supinator – rotates the hand, flexor - flexes and extensor – extends. The muscles in the hamstrings are also grouped in a similar way. The undulating lines both for the outlines and for those of the muscles really give a strong sense of movement.  My own version certainly doesn’t live up to this description.

Anatomy Sketch – from John Raynes Book
I found this drawing more enjoyable than the previous one. Some of the shapes and angles were inaccurate in on my first attempt, so I adjusted these. The most interesting part was doing the sketchy lines heading in multiple directions and the way they flowed into one another.

On comparing this drawing with the life drawing I did of the standing pose (one of the 3 Drawings exercises) it was easier to imagine much of the underlying muscle structure. I also noted how the hands in the illustration I referred to are drawn with a real feel for the underlying skeleton. When copying them I found it was easier to convey lifelike hands than previously. I hope this trend will continue unabated, but I'm not holding my breath. However, drawing the subject rather than just looking at the anatomical drawings, really seemed to help me to absorb the information more easily. 


Anatomy sketch                           Book illustration


Rodin’s Seated Nude
This to me is a good example of how  flowing and undulating outlines make out the rounded forms as in that of the ribcage, the shapes of the major muscles and where the bones are close to the underlying skin. 

8/2/11

GESTURE

Stance and Energy
These were rapid sketches ranging from about 3 to 5 minutes, and I was surprised at how much easier it was to obtain reasonable proportions I(I think) for most of them without measuring. I felt like my confidence had grown markedly.

  1. How well have you managed to capture the poses? What could be improved?
I scrutinized levels, angles and positions of each area in relation to one another, such as which way the head was tilted, mostly judging by eye and concentrating on the negative spaces. I needed my model to hold each pose for up to 5 minutes, so a moving pose like walking or lifting an arm had to be held for longer than usual. Apart from this, I couldn’t realistically expect him to hold any poses which would have been difficult  for around 5 minutes, so certain props were used as supports for a raised arm, when leaning forward and with one leg raised for instance – which would probably be impossible for most people to hold for this long.  Under the circumstances I think I managed to capture the poses (limited as they are) and get them to look convincing: he does appear to be leaning on something. Sometimes the proportions were out, especially the shape and width of some limbs. I tried to include just an impression of the hands but in the main they tend to look chunky and clumsy and as though the model is wearing mittens. Leaving them look more unfinished, with a lighter outline may have helped to avoid this problem and and given more of a sense of energy.

Do your figures look balanced? If not where did you go wrong?
I wasn’t aware of this fact when I did the sketches, but I since found out the shoulders and hips should tilt in opposite directions when the weight is taken on one foot. Strangely enough they do mostly appear to balance correctly, even though I didn’t check their angles with a pencil held at arm’s length this time. Albeit is hardly perceptible and in the side views I find it impossible to tell whether they are correct or not. I can also see that a straight vertical balance line usually ends up near the weight bearing foot. On the leaning pose some of the weight is taken by the arms and upper body so it would fall (as it does) some distance away from the feet.

How did you convey a sense of energy?
By working quickly from the start, drawing rapid broken lines with some undulations and following the direction of the gesture while studying the bend and curve of the limbs. The lines though could be more energetic and sweeping than they are; at the same time I was trying to juggle thinking in terms of cylinders, spheres and egg shapes to establish form. Where there are dense solid lines the model looks more static. Most poses weren’t very dynamic – couldn’t get model to hold tiring poses like twisting at all, or holding an arm in the air or leg off the ground without support for 5 mins. For conveying energy I think the first of the energy sketches looks most convincing as the model appears to be walking briskly when in fact he was standing still.

Stance 


Energy 1

Energy


Energy 2


Energy 3
Energy 4
Later I discovered the website of a sculptor who does some amazing gestural drawings. His lines wander around the body like wire wrapping. The poses appear to be slightly exagerrated in many, giving a powerful impression of movement and rythmn. For a link to the drawings on his website click here: http://dongalestudio.com/drawing/